

Guru – Cards Setup and Configuration
Card Products
The Product Details window within Card Products is divided into sections by way of tabs namely, Card Settings, Pricing, Availability, Play Privileges and Stock Privileges. Although the same tabs and fields are displayed for most product types, not all of the fields apply to all products. Therefore, if a field cannot be edited, it is because the selected product type was not intended to utilize it.
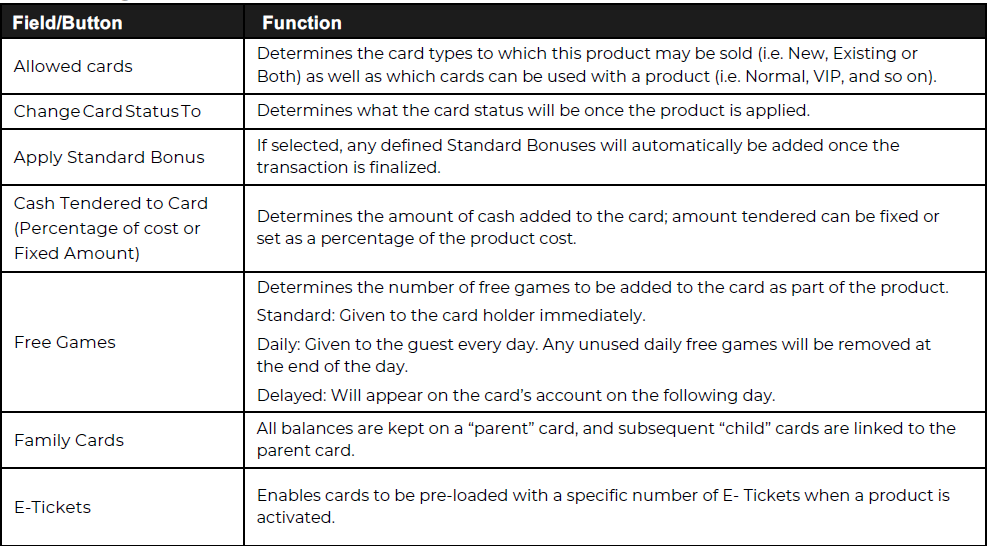
The Card Settings tab within Card Products contains general, overall configurations for the product. This is where the user can determine what card types are enabled for use with this product, the amount loaded onto the card, any free games or E-tickets and the card status this product will have.
Creating A Standard Card
- From the Products menu, select Card Products.
- From the Product Details screen, select Add.
- Enter the Product ID, Product Name, Product Description, Product Code and Product Barcode.
- Select Card Product from the Product Type drop-down menu.
- Select the type of card product from the Sub-Type drop-down menu (e.g., Standard or Reload).
- Select Card Sales from the Category drop-down menu.
- Select Card Sales from the Class drop-down menu.
- On the Card Settings tab, choose the Card Type and add any free games or e- tickets. Check the Card
- Status is correct.
- From the Pricing tab, enter the Individual Cost of the product.
- Select Save.
- Restart the SALES application and then test that the product you created works as intended.
Card Settings
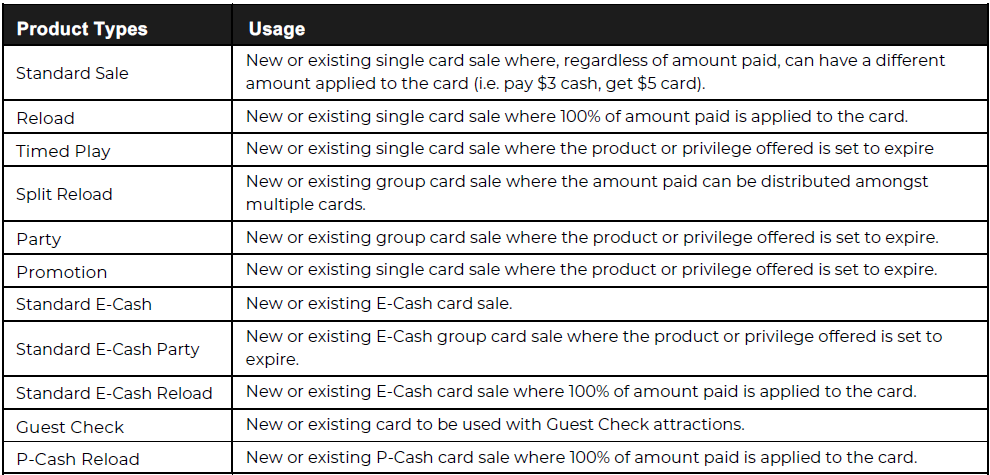
Card Product Sub-Types
There are eleven (11) sub-types of Card Products namely;
- Standard
- Reload
- Timed Play
- Split Reload
- Party
- Promotion
- Standard E-Cash
- Standard E-Cash Party
- Standard E-Cash Reload
- Guest Check
- P-CashReload
When viewing an existing card product, these can be seen in the sub-type drop down menu within
the Card Products window.
(see next page)
Pricing
The Pricing allows the user to define various costs the guest must pay to purchase the product.
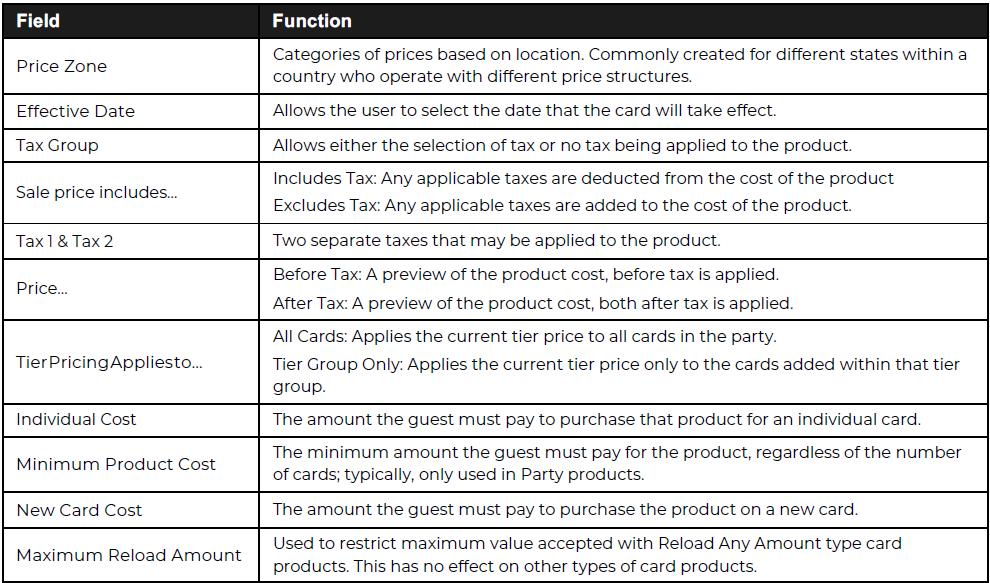
uNotes on taxes
• If there are no taxes to be collected on card sales, it is important to select the No Tax entry.
Availability
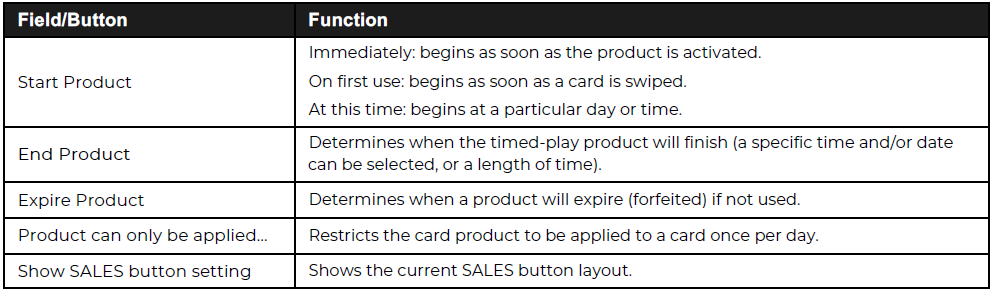
The Availability tab allows the user to define specific time-based settings. This includes determining when a Timed Play or Promotion product will begin, end and expire, as well as restricting the sale of the product itself to a certain time and date range.
Play Privilege
The Play Privileges tab provides the option to add game play privileges to a card product. These privileges are in addition to any cash and bonus added to the card and can be restricted to a specific game or a category of games.
Adding Play Privileges
- From Card Products, select the card product you wish to add play privileges to and click Edit.
- Select the Play Privileges tab.
- Click Add Game to add plays for a specific game or Add Group to add plays for a whole game group.
- Select the checkbox next to the game(s) you would like to add plays for.
- Enter the number of plays for these games. Note: if you select more than one game and apply a certain number of plays to them (e.g., select Virtua Cop and Time Crisis and then type 5 in the Number of Plays field) the guest will not receive 5 of each type of game. They will only have 5 games of either Virtua Cop or Time Crisis or a combination of both.
- Select when the privilege will start and expire (By default, the privilege will expire immediately when the product is sold).
- Select Save Changes.
- Repeat the process for each privilege.
- Restart SALES and test that the product you created works as intended.
uNotes on Adding a Play Privilege
- Play privileges cannot be added until the Card Product has been added to the system. If you are adding a new card product you must first save it, and then edit it to add play privileges.
- Plays are deducted from the card in the same order that they appear in Card Products. Therefore, if you add overlapping privileges (e.g., one play on the Go-Kart, plus one play on any game in the Attraction category) the user should first add the more specific privilege, followed by the broader privilege.
- Select when the stock is to be redeemed. For a single sale, the guest may Redeem with Sale or Later; for a party sale, the stock offer may be applied Per Party (only 1 offer per party), Per Card (1 offer for each card), or Per Card - Redeem Late.
- Select when the stock offer will expire (By default, the offer will expire immediately when the product is sold).
- Select OK so that the item is added to the list.
- Select Save to finalize all of the card product settings.
Was this article helpful?
That’s Great!
Thank you for your feedback
Sorry! We couldn't be helpful
Thank you for your feedback
Feedback sent
We appreciate your effort and will try to fix the article